Zabbix Server + Agent unter Ubuntu 24.04 LTS installieren
Aus znilwiki
Changelog:
- 10.06.2024 erste Version
- 27.06.2024 Automatischen Neustart von Diensten bei Upgrades deaktiviert / systemctl edit statt nano bei Änderungen an Startdateien von Diensten
- 07.11.2024 Darstellungen von Zeiten im 24h Format ergänzt
- 07.11.2024 Bei den Paketen für die Installation die Zabbix-Agent2-Plugins hinzugefügt (Agent startet sonst nicht)
- 12.11.2024 GUI-Spracheinstellung schon bei der Installation /
EnableGlobalScripts=1hinzugefügt - 15.05.2025 Hinweis zu den Paketquellen hinzugefügt, URL für Zabbix 7 angepasst
- 16.05.2025 Bei den Voraussetzungen den apache2 mit aufgenommen. Der wird zwar automatisch über das Zabbix Frontend mit installiert, bei einem Dist-Upgrade auf Ubuntu 24.04 dann aber deinstalliert weil die Paketquellen von Zabbix dann gerade inaktiv sind
- 27.05.2025 Die Installation der Hyper-V und QEMU Tools mit in die Grundinstallation aufgenommen / Deinstallation OpenIPMI hinzugefügt
- 28.06.2025 Bash History Hack hinzugefügt, ich baue das sowieso immer ein und so habe ich es gleich in der Anleitung
- 28.08.2025 Deinstallation von IPMItool hinzugefügt, sonst gibt es immer noch eine Fehlermeldung beim Start, nur OpenIPMI deinstallieren reichte nicht
Installation Ubuntu Server 24.04.x LTS (Long Term Support)
Einstellungen für die VM
Falls Ihr das System als virtuelle Maschine (VM) installiert so könnt Ihr folgenden Einstellungen als Beispiel nehmen.
- Konfiguration: Typisch
- Name und Speicherort: Nach eigener Wahl
- Speicher: Nach eigener Wahl
- Gastbetriebssystem: (*) Linux --> Ubuntu (64-Bit)
- Netzwerk:
- Wie viele Netzwerkkarten möchten Sie anschließen: 1
- Netzwerk: Nach Wahl (VM Network?)
- Adapter: VMXNET 3
- Größe der virtuellen Festplatte:
- Hängt von der Anzahl der Menge der Daten ab
- Ich empfehle min 32GB für das Betriebssystem des Servers.
- Die Festplatte kann bei einer VM nachträglich vergrößert werden - siehe dazu den Abschnitt in diesem Artikel weiter unten
- Man kann auch jederzeit eine weitere Festplatte anhängen und die Daten dorthin migrieren
- Thick-Provision Lazy-Zeroed
Danach Einstellungen der VM bearbeiten: Reiter Hardware:
- Arbeitsspeicher:
- 4GB oder mehr
- CPUs:
- Anzahl der virtuellen Sockets
- 4 oder mehr
- Anzahl der Cores pro Socket: 1 (Immer Anzahl der Sockets erhöhen)
- Anzahl der virtuellen Sockets
Reiter Optionen
- ...
Grundinstallation
CD einlegen und los,
die Fragen beantwortet Ihr wie folgt (sind ggf. die Überschriften der Dialoge):
Try or Install Ubuntu Server
]]Deutsch
German / German
- Wenn er einen neueren Installer findet und fragt ob er auf diesen aktualisieren soll - Ja!
 Ubuntu Server
Jetzt könnt Ihr schon die gewünschte feste IP-Adresse einstellen. Wählt dazu mit den Pfeiltasten den
ens160Eintrag aus und drückt Enter:ens192 => Bearbeite IPv4
Manuell
Bei Subnetz kommt nicht die Subnetzmaske sondern das Netzwerk mit Suffix. Bei einer 24 Maske (= 255.255.255.0) ist das die IP 0 mit Suffix /24
Erledigt
Bei Bedarf, sonst leer lassen
Erledigt
Nutzt die ganze Festplatte ohne LVM (also Haken entfernen). Die Festplatte lässt sich später trotzdem leicht vergrößern
Erledigt
Fortfahren
Den Servernamen festlegen. Ich lege hier den Benutzer installadmin an. Wählt euren Benutzer und Passwort nach Wunsch (Aufschreiben!)
Falls Ihr Ubuntu Pro habt, könnet Ihr es hier aktiveren, ansonsten einfach [Fortfahren]
OpenSSH-Server auswählen => Erledigt (für Zugriff z.B. mit Putty)
Erledigt
Ab jetzt heißt es abwarten. Wenn er kann lädt er gleich ein paar Sicherheitsupdates nach:
Jetzt neustarten
ISO aus der VM entfernen und Enter drücken
Nach dem Reboot wartet ab bis diverse Meldungen abgelaufen sind
PuTTY
Ab dieser Stelle könnt Ihr PuTTY oder den SSH Client eurer Wahl nutzen - was ich dringend empfehle. Denn dann könnt Ihr hier vorgeschlagenen Befehle einfach per Copy&Paste übernehmen.
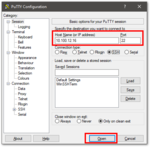
Die IP-Adresse habt Ihr zu diesem Zeitpunkt ja bereits festgelegt:
Nach der Anmeldung nutze ich immer gerne ein
sudo -i
Damit wechselt man dauerhaft zum root Benutzer und muss nicht vor jedem Befehl ein sudo stellen.
root wieder freischalten
sudo verwendet müsst Ihr selbst wissen- Mit Benutzer installadmin anmelden
sudo -i
- Kennwort des Benutzer installadmin eintippen
passwd root
- neues Kennwort für "root" 2x eintippen
- Lokal Anmelden kann man sich nun mit root - aber eine Anmeldung über SSH funktioniert dann immer noch nicht.
- Damit diese auch funktioniert müsst ihr die
sshd_configbearbeiten:
nano /etc/ssh/sshd_config
sucht nach der Zeile (STRG + W ist Suchen) nach
#PermitRootLogin without-password
und stellt den Cursor in die Zeile.
Drückt nun einmal F9 und 2x F10 - damit erstellt Ihr eine Kopie der Zeile.
Ändert die Kopie wie folgt ab:
PermitRootLogin yes
Speichert die Datei (STRG + x, dann y und Enter) und startet den ssh Dienst neu:
systemctl restart ssh.service
Ab dann klappt es auch mit dem SSH-Login für den Benutzer root, z.B. über puTTY
Jetzt 2x
exit
eintippen wodurch sich das PuTTY Fenster schließt - der (eingeschränkte) Benutzer installadmin hat sich somit abgemeldet
Ja, ich persönlich arbeite gerne als root und habe diesen für die Anmeldung freigeschaltet. Was ich nicht mache ist das Login per SSH mit Passwort zu erlauben. Ich hinterlege also immer einen SSH-Key für die Anmeldung und nutze diesen statt des Kennwortes. Die Lösung hier ist einfach gehalten, der Profi mögen anpassen wie er es braucht. Ein Anmeldung als eingeschränkter Benutzer geht natürlich auch, das erste was ich dann immer mache ist ein
sudo -i um dauerhaft zum root zu wechselnAnmelden als root
Startet PuTTY wieder und meldet euch diesmal gleich als Benutzer root an.
nano & Co auf Deutsch
nano war eben z.B. noch auf Englisch, mit
apt install -y language-pack-de
ist es (und vieles andere) auf deutsch.
root farbiger Prompt
Als root anmelden:
nano ~/.bashrc
Zeile 39 (Alt + C aktiviert Zeilennummernanzeige):
#force_color_prompt=yes
ändern zu (# entfernen):
force_color_prompt=yes
nun wieder Abmelden - ab der nächsten Anmeldung ist der neue Prompt aktiv.
Wer den sofort haben will (ohne neu Anmelden):
source ~/.bashrc
Bash History aus mehreren Sitzungen gleichzeitig
Wenn man mehr als eine SSH Sitzung zum Zabbix-Server hat, gewinnt in der Bash-Histoy die Sitzung von der man sich zuletzt abmeldet.
Nachfolgende Änderung sorgt dafür das sich alle Sitzungen eine Bash-History teilen, was ich in Session 1 also aufrufe lässt sich sofort danach in Session 2 per Pfeil nach oben oder STRG + R Suche finden.
Dazu bearbeiten man noch einmal die
nano ~/.bashrc
und hängt ganz unten folgendes an:
# don't put duplicate lines in the history. See bash(1) for more options
# ... or force ignoredups and ignorespace
HISTCONTROL=ignoredups:ignorespace:erasedups

# append to the history file, don't overwrite it
shopt -s histappend

# for setting history length see HISTSIZE and HISTFILESIZE in bash(1)
HISTSIZE=50000
HISTFILESIZE=50000

# After each command, append to the history file
#  and reread it
export PROMPT_COMMAND="${PROMPT_COMMAND:+$PROMPT_COMMAND$'n'}history -a; history -c; history -r"
Damit es sofort aktiv wird wieder
source ~/.bashrc
Ja, HISTSIZE und HISTFILESIZE stehen nun 2x in der Datei, der letzte Eintrag gewinnt.
Feste IP-Adresse vergeben
Der Server hat dank des neuen Setupdialoges nun bereits eine feste IP-Adresse.
Solltet Ihr an dieser etwas ändern müssen so müssen wir erst das Cloud-Init deaktivieren:
nano /etc/cloud/cloud.cfg.d/99-disable-network-config.cfg
Inhalt:
network: {config: disabled}
Dann könnte Ihr in der folgenden Datei etwas ändern, die Warnungen das es einen reboot nicht übersteht könnt Ihr ignorieren, dafür haben wir die andere Datei angelegt.
nano /etc/netplan/50-cloud-init.yaml
Updates einspielen
- wieder anmelden als root bzw. zum root wechseln
- Updates suchen für Betriebssystem: (aktualisiert den Katalog aus den Update-Quellen)
apt update
- Updates einspielen:
apt upgrade -y
- Nach Update überflüssige Pakete entfernen:
apt autoremove -y
Ich mache das normalerweise immer als Einzeiler:
apt update && apt upgrade -y && apt autoremove -y
VM Integrationsdienste installieren
Wenn euer Zabbix-Server eine VM, eine Virtuelle Maschine, ist, solltest Ihr je nach verwendeten Hypervisor die passenden Integrationsdienste installieren:
VMware
Unter VMware braucht ihr nichts tun, die
apt install open-vm-tools
sind per Default installiert und aktiv. Ist es keine VMware VM, so könnt Ihr die Tools per
apt remove open-vm-tools
entfernen
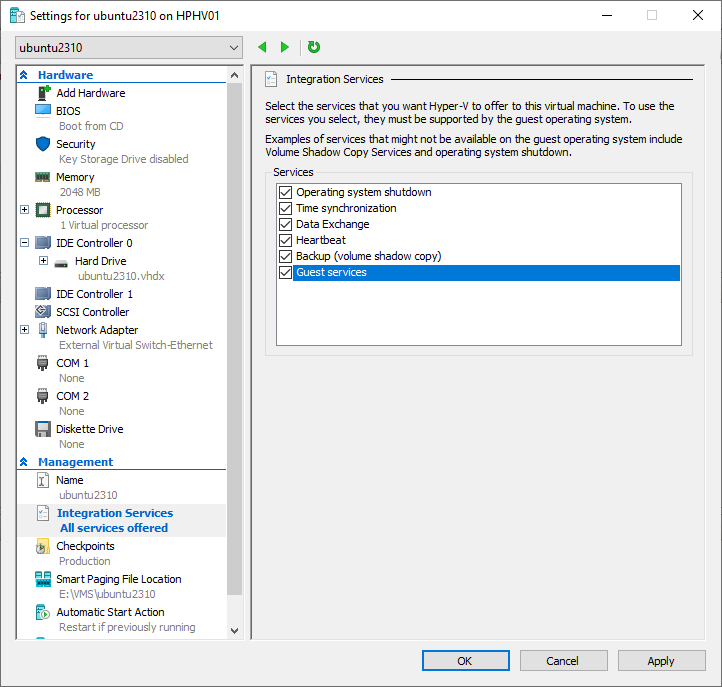
Hyper-V
In den Einstellungen der VM solltet Ihr hier den Haken setzen:
In der VM die folgende Datei bearbeiten:
nano /etc/initramfs-tools/modules
und ganz unten die folgenden 4 Zeilen anhängen:
hv_vmbus
hv_storvsc
hv_blkvsc
hv_netvsc
Und dann die Tools installieren:
apt -y install linux-virtual linux-cloud-tools-virtual linux-tools-virtual
update-initramfs -u
und neu starten:
reboot
Proxmox PVE
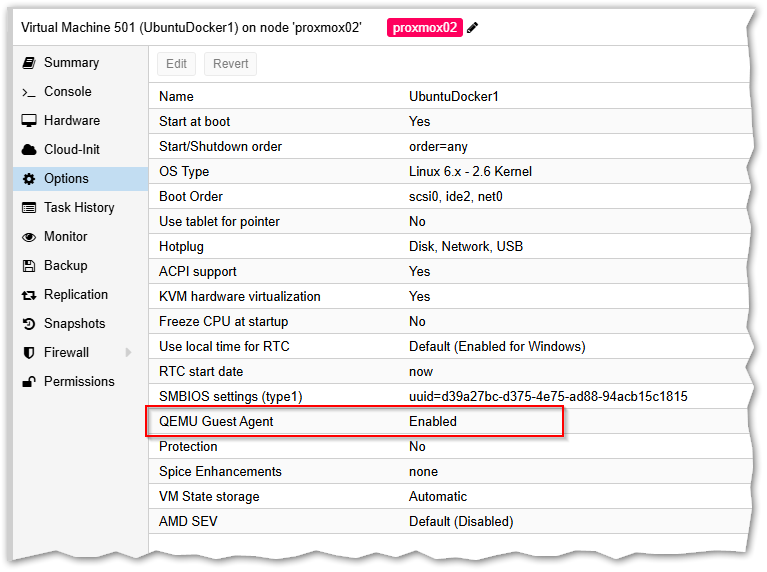
In den Einstellungen der VM den Agenten aktivieren:
Und dann in der VM die Tools installieren:
apt -y install qemu-guest-agent
Multipathing deinstallieren (wenn der Server eine VM ist)
Ab Werk wird nun das
/var/log/syslog
mit Multipath-Meldungen vollgemüllt:
2024-05-27T12:32:47.571374+00:00 ubuntu2404 systemd[1]: Started multipathd.service - Device-Mapper Multipath Device Controller.
2024-05-27T12:32:47.592304+00:00 ubuntu2404 kernel: systemd[1]: Listening on multipathd.socket - multipathd control socket.
2024-05-27T12:32:47.592385+00:00 ubuntu2404 kernel: systemd[1]: Starting multipathd.service - Device-Mapper Multipath Device Controller...
2024-05-27T12:32:48.141146+00:00 ubuntu2404 multipathd[467]: sda: failed to get udev uid: No data available
2024-05-27T12:32:48.141212+00:00 ubuntu2404 multipathd[467]: sda: failed to get path uid
2024-05-27T12:32:48.141278+00:00 ubuntu2404 multipathd[467]: uevent trigger error
2024-05-27T12:32:57.634912+00:00 ubuntu2404 multipathd[467]: sda: triggering change event to reinitialize
2024-05-27T12:32:57.667862+00:00 ubuntu2404 multipathd[467]: sda: failed to get udev uid: No data available
2024-05-27T12:32:57.667930+00:00 ubuntu2404 multipathd[467]: sda: failed to get path uid
2024-05-27T12:32:57.667959+00:00 ubuntu2404 multipathd[467]: uevent trigger error
2024-05-27T12:33:07.637080+00:00 ubuntu2404 multipathd[467]: sda: triggering change event to reinitialize
2024-05-27T12:33:07.676773+00:00 ubuntu2404 multipathd[467]: sda: failed to get udev uid: No data available
2024-05-27T12:33:07.676839+00:00 ubuntu2404 multipathd[467]: sda: failed to get path uid
2024-05-27T12:33:07.676865+00:00 ubuntu2404 multipathd[467]: uevent trigger error
2024-05-27T12:33:17.641466+00:00 ubuntu2404 multipathd[467]: sda: triggering change event to reinitialize
2024-05-27T12:33:17.709843+00:00 ubuntu2404 multipathd[467]: sda: failed to get sysfs uid: No such file or directory
2024-05-27T12:33:17.709915+00:00 ubuntu2404 multipathd[467]: sda: failed to get sgio uid: No such file or directory
2024-05-27T12:33:17.709942+00:00 ubuntu2404 multipathd[467]: sda: failed to get path uid
2024-05-27T12:33:17.709969+00:00 ubuntu2404 multipathd[467]: uevent trigger error
2024-05-27T12:33:28.134951+00:00 ubuntu2404 multipathd[467]: sda: not initialized after 3 udev retriggers
2024-05-27T12:33:29.139933+00:00 ubuntu2404 multipathd[467]: sda: add missing path
2024-05-27T12:33:29.140037+00:00 ubuntu2404 multipathd[467]: sda: failed to get sysfs uid: No such file or directory
2024-05-27T12:33:29.140063+00:00 ubuntu2404 multipathd[467]: sda: failed to get sgio uid: No such file or directory
2024-05-27T12:33:29.140086+00:00 ubuntu2404 multipathd[467]: sda: no WWID in state "undef
2024-05-27T12:33:29.140109+00:00 ubuntu2404 multipathd[467]: ", giving up
2024-05-27T12:33:29.140181+00:00 ubuntu2404 multipathd[467]: sda: check_path() failed, removing
Unter Ubuntu 24.04/22.04 scheint es nicht mehr ganz so schlimm wie unter 20.04 - aber in einer VM macht Multipath keinen Sinn, also deaktivieren und deinstallieren um das Syslog von den Meldungen befreien:
systemctl stop multipathd.service && systemctl disable multipathd.service
apt install kpartx libsgutils2-1.46-2 sg3-utils sg3-utils-udev
apt remove -y multipath-tools && apt purge -y multipath-tools
Die apt install Zeile ist da drin weil diese Pakete ggf. von anderen Anleitung vorausgesetzt werden. Die Pakete werden dadurch auf manuell installiert gesetzt und dann nicht bei einem apt autoremove deinstalliert
Cloud-Init deinstallieren (Wenn es keine VM bei einem Cloudanbieter ist)
Wenn Ihr die VM reboootet und die Console betrachtet tauchen kurz nach dem Reboot (Fehler-)Meldungen zum Cloud-init auf:
Das Cloud-Init ist - wenn ich mich recht erinnere - dafür da falls eure VM z.B. bei Amazon AWS, Azure oder andere Anbieter läuft um z.B. die Netzwerkinformationen vom Hoster/Provider zu erhalten.
Brauchen wir nicht, also weg damit:
echo 'datasource_list: [ None ]' | tee /etc/cloud/cloud.cfg.d/90_dpkg.cfg
apt purge -y cloud-init
rm -rf /etc/cloud/ && sudo rm -rf /var/lib/cloud/
apt install eatmydata libeatmydata1 python-babel-localedata python3-babel python3-jinja2 python3-json-pointer python3-jsonpatch python3-jsonschema python3-markupsafe python3-pyrsistent python3-tz -y
reboot
Die apt install Zeile ist da drin weil diese Pakete ggf. von anderen Anleitung vorausgesetzt werden. Die Pakte werden dadurch auf manuell installiert gesetzt und dann nicht bei einem apt autoremove deinstalliert
OpenIPMI und IPMItool deinstallieren
Bei meinen VMs schlägt der Start dieses Dienstes eh immer fehl (weil es keine passende Hardware gibt), also weg damit:
apt remove openipmi ipmitool -y && apt purge openipmi ipmitool && apt autoremove -y
Unter Hyper-V wird das Paket scheinbar nicht automatisch installiert.
Zeitzone setzen
In meiner VM ist die Uhrzeit zu diesem Zeitpunkt falsch (gebt mal probeweise date ein) - weil der ESXi-Host auf UTC Zeit läuft und die Ubuntu in der VM die richtige Zeitzone nicht eingestellt hat.
Wir korrigieren das mit
timedatectl set-timezone Europe/Berlin
ein
date
sollte dann die richtige Uhrzeit ausspucken.
Zeitserver setzen
Für die Zeitsynchronisierung ist der Dienst systemd-timesyncd.service zuständig, dieser wird über die Datei
nano /etc/systemd/timesyncd.conf
konfiguriert:
#  This file is part of systemd.
#
#  systemd is free software; you can redistribute it and/or modify it under the
#  terms of the GNU Lesser General Public License as published by the Free
#  Software Foundation; either version 2.1 of the License, or (at your option)
#  any later version.
#
# Entries in this file show the compile time defaults. Local configuration
# should be created by either modifying this file (or a copy of it placed in
# /etc/ if the original file is shipped in /usr/), or by creating "drop-ins" in
# the /etc/systemd/timesyncd.conf.d/ directory. The latter is generally
# recommended. Defaults can be restored by simply deleting the main
# configuration file and all drop-ins located in /etc/.
#
# Use 'systemd-analyze cat-config systemd/timesyncd.conf' to display the full config.
#
# See timesyncd.conf(5) for details.

[Time]
NTP=192.168.1.81
FallbackNTP=192.168.1.198 de.pool.ntp.org
RootDistanceMaxSec=30
#PollIntervalMinSec=32
#PollIntervalMaxSec=2048
#ConnectionRetrySec=30
#SaveIntervalSec=60
Sowohl die Liste der NTP= als auch der FallbackNTP= erwartet eine per Leerzeichen getrennte Liste der möglichen Server.
Laut Anleitung hört der Dienst aber beim ersten Treffer auf zu suchen. In der Praxis setzt also einen NTP-Server und ggf. die Fallback. Setzt Ihr einen Wert nicht, lasst diesen also auskommentiert, so gilt der Default-Wert, beim Fallback gilt dann FallbackNTP=ntp.ubuntu.com.
Nach der Änderung müsst Ihr den Dienst einmal neu starten:
systemctl restart systemd-timesyncd.service
und mit folgenden Befehl könnt Ihr den Status abfragen:
timedatectl show-timesync
Beispielausgabe:
LinkNTPServers=fd00::1eed:6fff:fe71:f1c0
SystemNTPServers=192.168.1.81
FallbackNTPServers=192.168.1.198 de.pool.ntp.org
ServerName=192.168.1.81
ServerAddress=192.168.1.81
RootDistanceMaxUSec=30s
PollIntervalMinUSec=32s
PollIntervalMaxUSec=34min 8s
PollIntervalUSec=2min 8s
NTPMessage={ Leap=0, Version=3, Mode=4, Stratum=3, Precision=-23, RootDelay=20.324ms, RootDispersion=28.579ms, Reference=C0A801C6, OriginateTimestamp=Tue 2024-06-04 08:22:24 CEST,
ReceiveTimestamp=Tue 2024-06-04 08:22:24 CEST, TransmitTimestamp=Tue 2024-06-04 08:22:24 CEST, DestinationTimestamp=Tue 2024-06-04 08:22:24 CEST, Ignored=no, PacketCount=2, Jitter=239us }
Frequency=1158037
Wenn die untere Zeile mit NTPMessage= nicht erscheint, habt Ihr ein Problem!
Mit
journalctl -fu systemd-timesyncd.service
könnte Ihr nach dem Grund suchen. Steht da etwas wie Server has to large root distance. Disconnecting und es gegen einen Domänencontroller geht so stellt sicher das
- Es der PDC ist
- Dieser sich auch selbst mit einer externen Quelle synchronisiert
- Stellt ggf. den Wert von
RootDistanceMaxUSec=30snoch höher.
Automatische Updates deaktivieren
Ich persönlich möchte nicht das der Zabbix-Server automatisch Updates einspielt.
Die automatischen Updates aktualisieren - soweit ich das beobachten konnte - nur den Kernel. Aber auch das möchte ich nicht. Ich möchte das geplant durchführen.
Die automatischen Updates verhindern wir mit
apt remove -y unattended-upgrades
Wer möchte kann auch die Suche nach Updates deaktivieren. Ansonsten schaut das Ubuntu täglich an einem zufälligen Zeitpunkt nach, ob es Updates gibt. Bei der Anmeldung per SSH erhält man dann eine entsprechende Meldung. Deaktivieren kann man die automatsche Suche danach per
nano /etc/apt/apt.conf.d/20auto-upgrades
und in der Datei beide Optionen auf 0 setzen:
APT::Periodic::Update-Package-Lists "0";
APT::Periodic::Unattended-Upgrade "0";
Automatischen Neustart von Diensten bei Updates deaktivieren
Wie schon zuvor beschrieben aktualisiere ich Ubuntu (und andere Software aus Repositorien wie Zabbix) gerne per folgenden Einzeiler:
apt update && apt upgrade -y && apt autoremove -y
In neueren Versionen werden dabei Dienste ggf. automatische neu gestartet, es gibt dann eine Meldung wie diese:
systemctl restart apache2.service cron.service fwupd.service mariadb.service open-vm-tools.service packagekit.service polkit.service rsyslog.service snmptrapd.service snmptt.service udisks2.service upower.service vgauth.service zabbix-agent2.service zabbix-web-service.service

Dienste deren Neustart verschoben wurde:
 systemctl restart ModemManager.service
 /etc/needrestart/restart.d/dbus.service
 systemctl restart getty@tty1.service
 systemctl restart systemd-logind.service
Im Normalfall ist es kein Problem. Allerdings scheinen die Abhängigkeiten der Dienste nicht beachtet zu werden.
Zum Beispiel der Zabbix-Server Dienst ist abhängig von der Datenbank, das steht auch so in der /usr/lib/systemd/system/zabbix-server.service:
After=mysql.service
After=mysqld.service
After=mariadb.service
Der automatische Neustart startet aber z.B. MariaDB gnadenlos durch ohne vorher den Zabbix zu beenden. Dabei hängt sich das ganze gerne mal weg. Per {{Key|STRG} + {Key|C} kann man das abbrechen und rebooten, schön ist das aber nicht.
Als Lösung schalte ich inzwischen den automatischen Neustart der Dienste ab, es wird dann nur eine Liste der Dienste ausgegeben die neu gestartet werden müssten:
nano /etc/needrestart/needrestart.conf
und dort ziemlich am Anfang:
# Restart mode: (l)ist only, (i)nteractive or (a)utomatically.
#
# ATTENTION: If needrestart is configured to run in interactive mode but is run
# non-interactive (i.e. unattended-upgrades) it will fallback to list only mode.
#
# UBUNTU: the default restart mode when running as part of the APT hook is 'a',
# unless a specific UI is configured (see below).
#$nrconf{restart} = 'i';
Bei der letzten Zeile entfernen wir das Kommentarzeichen davor und machen aus dem i ein l, wie es auch in der obersten Zeile beschrieben wird:
$nrconf{restart} = 'l';
So werden notwendige Neustarts nur aufgelistet.
Benötigte Programme für Zabbix installieren
Die nachfolgende Zeile installiert alles notwendige um alle Features eines Zabbix-Server zu nutzen. Als Datenbank wird MariaDB verwendet.
Wer lieber MySQL verwenden will muss in der Zeile mariadb-server durch mysql-server ersetzen:
apt install apache2 dnsutils htop make gcc libc6-dev libmysqlclient-dev libcurl4-openssl-dev libssh2-1-dev libsnmp-dev libiksemel-dev mariadb-server libopenipmi-dev fping php-gd snmp libsnmp-base openjdk-11-jdk unixodbc unixodbc-dev libxml2 libxml2-dev snmp-mibs-downloader snmpd snmptrapd snmptt sblim-wbemcli php-ldap traceroute ipmitool libldap2-dev php-bcmath php-mbstring php-xml fonts-dejavu-core libnet-snmp-perl libsnmp-perl libnet-ip-perl libnet-netmask-perl libnet-dns-perl libxml-writer-perl language-pack-en -y
apt gehen und 3x Klicken. Ggf. mehrmals versuchen - bis die ganze Zeile markiert ist. Diese kann dann so in z.B. PuTTY eingefügt werden
Mit der obigen Zeite werden gewiss einige Pakete zuviel installiert - unter anderem alles was nötig wäre um Zabbix auch direkt aus dem Quellcode zu kompilieren. Aber es sind dann auch definitiv alle notwendigen Voraussetzungen für jegliche Zabbix-Abfrage vorhanden, z.B. für den Empfang von SNMP-Traps - unter anderem zum Beispiel die ganzen PHP-Pakete inklusive LDAP.
Zabbix Server installieren
Ich würde in einer Produktivumgebung immer eine der LTS-Varianten installieren. Auch wenn es einem in den Finger juckt wegen der neuen Features.
Ihr müsstet spätestens nach 6 Monaten ein Upgrade auf die nächste Version durchführen!
Ich persönlich nutze auch privat nur die LTS-Version. Die Zwischenversionen installiere ich separat zum Testen.
Zabbix Repository hinzufügen
wget https://repo.zabbix.com/zabbix/7.0/ubuntu/pool/main/z/zabbix-release/zabbix-release_latest_7.0+ubuntu24.04_all.deb
dpkg -i zabbix-release_latest_7.0+ubuntu24.04_all.deb
apt update && apt upgrade -y
rm zabbix-release_*
wget https://repo.zabbix.com/zabbix/6.4/ubuntu/pool/main/z/zabbix-release/zabbix-release_6.4-1+ubuntu24.04_all.deb
dpkg -i zabbix-release_6.4-1+ubuntu24.04_all.deb
apt update && apt upgrade -y
rm zabbix-release_*
wget https://repo.zabbix.com/zabbix/6.0/ubuntu/pool/main/z/zabbix-release/zabbix-release_6.0-6+ubuntu24.04_all.deb
dpkg -i zabbix-release_6.0-6+ubuntu24.04_all.deb
apt update && apt upgrade -y
rm zabbix-release_*
apt update && apt upgrade -y ist notwendig da ich bemerkt habe das darüber auch das Zabbix-Repo selbst geupdatet wurde. (Kann sich wieder ändern, schadet aber auch nicht)Zabbix installieren
Die Installation der ausführbaren Dateien erfolgt bei allen Varianten nach /sbin !
Fehlermeldungen zum Zabbix Java Gateway ignorieren!
 Als Server
Ab Version 6.0
apt install -y zabbix-server-mysql zabbix-sql-scripts zabbix-frontend-php zabbix-apache-conf zabbix-agent2 zabbix-agent2-plugin-* zabbix-get zabbix-sender zabbix-java-gateway zabbix-web-service
 Als Proxy
Ab Version 6.0
apt install -y zabbix-proxy-mysql zabbix-sql-scripts zabbix-agent2 zabbix-agent2-plugin-* zabbix-get zabbix-sender zabbix-java-gateway
Java Gateway deaktivieren
Die wenigsten werden es nutzen - doch diese Anleitung ist so gemacht das sich danach alle Features von Zabbix nutzen lassen.
Wann braucht Ihr es? Wenn Ihr Java-Applikationen habt die Ihr aus dieser Applikation selbst monitoren wollt. Dazu müssen beim Start der Applikation extra Parameter hierfür übergeben werden (nämlich unter anderen die Daten des Java-Gateways).
Wer es nicht braucht (und gerade nur Bahnhof verstanden hat) deaktiviert es mit
systemctl stop zabbix-java-gateway.service && systemctl disable zabbix-java-gateway.service
Bei der Installation gab es ggf. Fehlermeldungen das der Dienst nicht gestartet werden konnte - das würde jetzt aber funktionieren.
MariaDB (MySQL) Datenbank optimieren
Die Einrichtung wird auch hier beschrieben - allerdings etwas knapp: https://www.zabbix.com/documentation/current/manual/appendix/install/db_scripts
Die Zabbix-Datenbank kann recht groß werden und jeder Zugriff zählt. Ich habe mir deshalb mal aus diversen Quellen im Internet Tipps zusammengesucht um die Performance der Datenbank zu steigern.
MariaDB Einstellungen bearbeiten (wer MySQL einsetzt findet die passende Datei unter nano /etc/mysql/mysql.conf.d/mysqld.cnf):
nano /etc/mysql/mariadb.conf.d/50-server.cnf
und unterhalb von
[mysqld]
Diese Zeilen einfügen (und die Kommentare lesen / beachten!!!):
# Größe der Logdatei statt 10MB
innodb_log_file_size = 512M
# Transaktionswerte nach Möglichkeit nicht in den Doublewritebuffer schreiben
innodb_doublewrite = 0
# Transaktionen schon bestätigen sobald diese im Cache stehen:
innodb_flush_log_at_trx_commit = 2
# Wieviel Hauptspeicher soll zum Puffern verwendet werden? Nehmt die Hälfte des vorhandenen Speichers (bei 4GB RAM also 2G, bei 1G also 512M)
innodb_buffer_pool_size = 1G
# Eigenes Fehlerprotokoll wieder aktivieren
log_error = /var/log/mysql/error.log
mit STRG + x den nano verlassen und speichern bestätigen j + Enter)
innodb_buffer_pool_size!!! Dieser Wert darf nicht größer sein als der tatsächlich vorhandene RAM, sonst startet MySQL nicht
Prüft ggf. ob diese Zeilen dann nicht doppelt vorkommen!
Wenn Ihr später immer mehr Poller, Pinger und andere Zabbix-Prozesse startet müsst Ihr auch die Anzahl der möglichen Verbindungen zu MySQL Datenbank erhöhen.
Auch jeder Nutzer der auf dem Webinterface arbeitet verbraucht Verbindungen. Im zabbix_server.log steht dann eine Meldung mit "too many connection".
Sucht die Zeile
#max_connections = 100
und ändert diese auf
max_connections = 300
Den Ordner für das Log anlegen und den Besitzer setzen:
mkdir -m 2750 /var/log/mysql
chown -R mysql:mysql /var/log/mysql
Nun müssen wir den mysql Server einmal neu starten:
systemctl restart mariadb.service
Ob Ihr alles richtig gemacht habt könnt Ihr im Log kontrollieren:
cat /var/log/mysql/error.log
Die Ausgabe sollte dann etwa so aussehen:
2024-06-10 14:36:36 0 [Note] Starting MariaDB 10.11.7-MariaDB-2ubuntu2 source revision  as process 18765
2024-06-10 14:36:36 0 [Note] InnoDB: Compressed tables use zlib 1.3
2024-06-10 14:36:36 0 [Note] InnoDB: Number of transaction pools: 1
2024-06-10 14:36:36 0 [Note] InnoDB: Using crc32 + pclmulqdq instructions
2024-06-10 14:36:36 0 [Note] InnoDB: Using liburing
2024-06-10 14:36:36 0 [Note] InnoDB: Initializing buffer pool, total size = 4.000GiB, chunk size = 64.000MiB
2024-06-10 14:36:36 0 [Note] InnoDB: Initialized memory pressure event listener
2024-06-10 14:36:36 0 [Note] InnoDB: Completed initialization of buffer pool
2024-06-10 14:36:36 0 [Note] InnoDB: Buffered log writes (block size=512 bytes)
2024-06-10 14:36:37 0 [Note] InnoDB: End of log at LSN=47108
2024-06-10 14:36:37 0 [Note] InnoDB: 128 rollback segments are active.
2024-06-10 14:36:37 0 [Note] InnoDB: Setting file './ibtmp1' size to 12.000MiB. Physically writing the file full; Please wait ...
2024-06-10 14:36:37 0 [Note] InnoDB: File './ibtmp1' size is now 12.000MiB.
2024-06-10 14:36:37 0 [Note] InnoDB: log sequence number 47108; transaction id 16
2024-06-10 14:36:37 0 [Note] InnoDB: Loading buffer pool(s) from /var/lib/mysql/ib_buffer_pool
2024-06-10 14:36:37 0 [Note] Plugin 'FEEDBACK' is disabled.
2024-06-10 14:36:37 0 [Warning] You need to use --log-bin to make --expire-logs-days or --binlog-expire-logs-seconds work.
2024-06-10 14:36:37 0 [Note] Server socket created on IP: '127.0.0.1'.
2024-06-10 14:36:37 0 [Note] InnoDB: Buffer pool(s) load completed at 240610 14:36:37
2024-06-10 14:36:37 0 [Note] /usr/sbin/mariadbd: ready for connections.
Version: '10.11.7-MariaDB-2ubuntu2'  socket: '/run/mysqld/mysqld.sock'  port: 3306  Ubuntu 24.04
Wichtig ist immer die Zeile mit dem Socket und Port (hier die vorletzte) - da muss der Port auftauchen auf dem der Server lauscht, in der Regel 3306
MariaDB/MySQL Datenbank erstellen und einrichten
- Zabbix Datenbank anlegen: (ab Zabbix 6.0)
mysql -u root -e "create database zabbix character set utf8mb4 collate utf8mb4_bin"
mysql -u root -e "create user 'zabbix'@'localhost' identified by 'zabbix'"
mysql -u root -e "grant all privileges on zabbix.* to 'zabbix'@'localhost'"
mysql -u root -e "SET GLOBAL log_bin_trust_function_creators = 1"
als Einzeiler:
mysql -u root -e "create database zabbix character set utf8mb4 collate utf8mb4_bin" && mysql -u root -e "create user 'zabbix'@'localhost' identified by 'zabbix'" && mysql -u root -e "grant all privileges on zabbix.* to 'zabbix'@'localhost'" && mysql -u root -e "SET GLOBAL log_bin_trust_function_creators = 1"
Die Datenbank heißt zabbix, der Datenbankbenutzer "zabbix" mit dem Passwort "zabbix" - wenn er also nach einem Passwort fragt nun dieses eingeben. Falls das jemand für unsicher hält - nun der MySQL Server sollte - wenn man es nicht ändert - eh nur lokale Anfragen erlauben, sprich von extern komme ich gar nicht ran.
Aber selbstverständlich könnt Ihr ein entsprechendes Passwort setzen, Ihr müsst dies nur im weiteren Verlauf der Anleitung beachten:
- beim dem Anlegen des Benutzers setzt Ihr euer Passwort bei
identified by 'zabbix'"ein (das zabbix durch euer Passwort ersetzen - Nachfolgend immer wenn es
-pzabbixwieder das Wort zabbix durch euer Passwort ersetzen oder aber einfach nur-pangeben - dann fragt er jedes mal nach
![]() Bei einem Server:
Bei einem Server:
Ab Version 6.0
zcat /usr/share/zabbix-sql-scripts/mysql/server.sql.gz | mysql --default-character-set=utf8mb4 -uzabbix -pzabbix zabbix
![]() Bei einem Proxy:
Auf einem Proxy darf nur die
Bei einem Proxy:
Auf einem Proxy darf nur die schema.sql importiert werden!!!!
Solltet Ihr aus versehen alle Schema importiert haben so löscht die Datenbank noch einmal und fangt von vorne an! Der Proxy funktioniert nicht wenn er alle Schemas hat!
Ab Version 6.0
cat /usr/share/zabbix-sql-scripts/mysql/proxy.sql | mysql --default-character-set=utf8mb4 -uzabbix -pzabbix zabbix
Konfigurationsdateien anpassen
Nun die Konfigurationsdatei bearbeiten:
![]() für einen Server:
für einen Server:
nano /etc/zabbix/zabbix_server.conf
- folgende Zeilen finden und auf diese Werte ändern, ggf. den # davor entfernen, STRG + W ist suchen!
DBHost=localhost
DBName=zabbix
DBUser=zabbix
DBPassword=zabbix

LogSlowQueries=20000

StartIPMIPollers=1
StartPollersUnreachable=5
StartPingers=10
StartVMwareCollectors=5

#Die Cache Werte ggf. dem vorhandenen Arbeitsspeicher anpassen!
#Oder nicht ändern - Zabbix warnt euch wenn ein Wert ausgeschöpft ist und vergrößert werden muss - wenn das Template "Zabbix Server" zugeordnet wurde
VMwareCacheSize=64M
CacheSize=128M
HistoryCacheSize=64M
HistoryIndexCacheSize=16M
TrendCacheSize=64M
TrendFunctionCacheSize=64M
ValueCacheSize=64M

Timeout=30

# Problem mit fping6 beheben (ja, richtig, nichts hinter dem = Zeichen!)
Fping6Location=

EnableGlobalScripts=1
nano /etc/zabbix/zabbix_proxy.conf
- folgende Zeilen finden und auf diese Werte ändern, ggf. den # davor entfernen, STRG + W ist suchen!
ProxyMode=0

#IP oder DNS Name des Zabbix-Servers an den gemeldet werden soll. Falls der Port nicht 10051 ist dann mit : dahinter setzen
Server=123.123.123.123

# Hostname -> unter diesem Namen müssen wir den Proxy auch auf dem Hauptserver anlegen!
Hostname=zabbixproxy

DBHost=localhost
DBName=zabbix
DBUser=zabbix
DBPassword=zabbix

EnableRemoteCommands=1

Timeout=30

StartVMwareCollectors=5
# Nachfolgend: Richtig, nichts darf hinter dem = stehen!
Fping6Location=
Hinweis:Unter Ubuntu 24.04 istfping und fping6 das gleiche Programm. Die 6er Variante ist nur ein symbolischer Link auf die normale Version. Auf meinem Proxy zickte er deswegen rum (der hat eine IPv6 konfiguriert). Wenn den Eintrag wie zuvor beschrieben abändert geht es ohne Probleme.
Die Fehlermeldung die er bringt ist
Cannot detect the minimum interval of /usr/bin/fping6
Automatischen Start beim Booten einrichten
Die notwendigen Skripte werden bei der Installation aus den Repository direkt mit installiert, wir müssen diese nur noch aktivieren:
![]() Auf einem Server
Auf einem Server
systemctl enable zabbix-server.service
systemctl enable zabbix-proxy.service
systemctl enable zabbix-agent2.service
Start von Zabbix testen
Nun müsste man den Zabbix Server wie andere Dienste auch über systemctl starten können
systemctl start zabbix-server
Wenn alles in Ordnung ist gibt es keine Rückmeldung durch systemctl, also fragen wir nach dem Status:
systemctl status zabbix-server
Ausgabe:
● zabbix-server.service - Zabbix Server
     Loaded: loaded (/usr/lib/systemd/system/zabbix-server.service; enabled; preset: enabled)
     Active: active (running) since Mon 2024-06-10 14:53:01 CEST; 9s ago
    Process: 19072 ExecStart=/usr/sbin/zabbix_server -c $CONFFILE (code=exited, status=0/SUCCESS)
   Main PID: 19074 (zabbix_server)
      Tasks: 89 (limit: 9444)
     Memory: 78.1M (peak: 79.0M)
        CPU: 224ms
     CGroup: /system.slice/zabbix-server.service
             ├─19074 /usr/sbin/zabbix_server -c /etc/zabbix/zabbix_server.conf
             ├─19077 "/usr/sbin/zabbix_server: ha manager"
             ├─19078 "/usr/sbin/zabbix_server: service manager #1 [processed 0 events, updated 0 event tags, deleted 0 problems, synced 0 service updates, idle 5.005142 sec>
             ├─19079 "/usr/sbin/zabbix_server: configuration syncer [synced configuration in 0.135607 sec, idle 10 sec]"
             ├─19083 "/usr/sbin/zabbix_server: alert manager #1 [sent 0, failed 0 alerts, idle 5.042655 sec during 5.042817 sec]"
             ├─19084 "/usr/sbin/zabbix_server: alerter #1 started"
             ├─19085 "/usr/sbin/zabbix_server: alerter #2 started"
             ├─19086 "/usr/sbin/zabbix_server: alerter #3 started"
             ├─19087 "/usr/sbin/zabbix_server: preprocessing manager #1 [queued 1, processed 2 values, idle 5.337594 sec during 5.338002 sec]"
             ├─19088 "/usr/sbin/zabbix_server: lld manager #1 [processed 0 LLD rules, idle 5.006159sec during 5.006252 sec]"
             ├─19089 "/usr/sbin/zabbix_server: lld worker #1 started"
             ├─19090 "/usr/sbin/zabbix_server: lld worker #2 started"
             ├─19091 "/usr/sbin/zabbix_server: ipmi manager #1 [scheduled 0, polled 0 values, idle 5.015535 sec during 5.015640 sec]"
             ├─19093 "/usr/sbin/zabbix_server: housekeeper [startup idle for 30 minutes]"
             ├─19094 "/usr/sbin/zabbix_server: timer #1 [updated 0 hosts, suppressed 0 events in 0.001857 sec, idle 58 sec]"
             ├─19095 "/usr/sbin/zabbix_server: http poller #1 [got 0 values in 0.000041 sec, idle 5 sec]"
             ├─19097 "/usr/sbin/zabbix_server: browser poller #1 [got 0 values in 0.000025 sec, idle 5 sec]"
             ├─19099 "/usr/sbin/zabbix_server: discovery manager #1 [processing 0 rules, 0 unsaved checks]"
             ├─19100 "/usr/sbin/zabbix_server: history syncer #1 [processed 1 values, 1 triggers in 0.003581 sec, idle 1 sec]"
             ├─19101 "/usr/sbin/zabbix_server: history syncer #2 [processed 0 values, 0 triggers in 0.000027 sec, idle 1 sec]"
             ├─19102 "/usr/sbin/zabbix_server: history syncer #3 [processed 0 values, 0 triggers in 0.000015 sec, idle 1 sec]"
             ├─19110 "/usr/sbin/zabbix_server: history syncer #4 [processed 0 values, 0 triggers in 0.000008 sec, idle 1 sec]"
             ├─19113 "/usr/sbin/zabbix_server: escalator #1 [processed 0 escalations in 0.000793 sec, idle 3 sec]"
             ├─19114 "/usr/sbin/zabbix_server: ipmi poller #1 started"
             ├─19115 "/usr/sbin/zabbix_server: proxy poller #1 [exchanged data with 0 proxies in 0.000026 sec, idle 5 sec]"
             ├─19116 "/usr/sbin/zabbix_server: self-monitoring [processed data in 0.000019 sec, idle 1 sec]"
             ├─19117 "/usr/sbin/zabbix_server: vmware collector #1 [updated 0, removed 0 VMware services, idle 5.000000 sec during 5.000436 sec]"
             ├─19118 "/usr/sbin/zabbix_server: vmware collector #2 [updated 0, removed 0 VMware services, idle 5.000000 sec during 5.000354 sec]"
             ├─19119 "/usr/sbin/zabbix_server: vmware collector #3 [updated 0, removed 0 VMware services, idle 5.000000 sec during 5.000397 sec]"
             ├─19120 "/usr/sbin/zabbix_server: vmware collector #4 [updated 0, removed 0 VMware services, idle 5.000000 sec during 5.000504 sec]"
             ├─19123 "/usr/sbin/zabbix_server: vmware collector #5 [updated 0, removed 0 VMware services, idle 5.000000 sec during 5.000393 sec]"
             ├─19124 "/usr/sbin/zabbix_server: task manager [processed 0 task(s) in 0.001907 sec, idle 5 sec]"
             ├─19125 "/usr/sbin/zabbix_server: poller #1 [got 0 values in 0.000017 sec, idle 5 sec]"
             ├─19127 "/usr/sbin/zabbix_server: poller #2 [got 0 values in 0.000028 sec, idle 5 sec]"
             ├─19128 "/usr/sbin/zabbix_server: poller #3 [got 0 values in 0.000014 sec, idle 5 sec]"
             ├─19129 "/usr/sbin/zabbix_server: poller #4 [got 0 values in 0.000022 sec, idle 5 sec]"
             ├─19130 "/usr/sbin/zabbix_server: poller #5 [got 0 values in 0.000012 sec, idle 5 sec]"
             ├─19131 "/usr/sbin/zabbix_server: unreachable poller #1 [got 0 values in 0.000014 sec, idle 5 sec]"
             ├─19132 "/usr/sbin/zabbix_server: unreachable poller #2 [got 0 values in 0.000016 sec, idle 5 sec]"
             ├─19133 "/usr/sbin/zabbix_server: unreachable poller #3 [got 0 values in 0.000016 sec, idle 5 sec]"
             ├─19134 "/usr/sbin/zabbix_server: unreachable poller #4 [got 0 values in 0.000015 sec, idle 5 sec]"
             ├─19135 "/usr/sbin/zabbix_server: unreachable poller #5 [got 0 values in 0.000013 sec, idle 5 sec]"
             ├─19136 "/usr/sbin/zabbix_server: unreachable poller #6 [got 0 values in 0.000022 sec, idle 5 sec]"
Zum Verlassen q drücken.
Genaueres können wir uns auch noch einmal im Log-File ansehen:
tail -fn 1000 /var/log/zabbix/zabbix_server.log
Ausgabe:
19074:20240610:145301.788 Starting Zabbix Server. Zabbix 7.0.0 (revision 49955f1fb5c).
19074:20240610:145301.788 ****** Enabled features ******
19074:20240610:145301.788 SNMP monitoring:           YES
19074:20240610:145301.788 IPMI monitoring:           YES
19074:20240610:145301.788 Web monitoring:            YES
19074:20240610:145301.788 VMware monitoring:         YES
19074:20240610:145301.788 SMTP authentication:       YES
19074:20240610:145301.788 ODBC:                      YES
19074:20240610:145301.788 SSH support:               YES
19074:20240610:145301.788 IPv6 support:              YES
19074:20240610:145301.788 TLS support:               YES
19074:20240610:145301.788 ******************************
19074:20240610:145301.788 using configuration file: /etc/zabbix/zabbix_server.conf
19074:20240610:145301.801 current database version (mandatory/optional): 07000000/07000000
19074:20240610:145301.801 required mandatory version: 07000000
19077:20240610:145301.804 starting HA manager
19077:20240610:145301.806 HA manager started in active mode
19074:20240610:145301.812 server #0 started [main process]
19078:20240610:145301.812 server #1 started [service manager #1]
19079:20240610:145301.813 server #2 started [configuration syncer #1]
19083:20240610:145301.951 server #3 started [alert manager #1]
19084:20240610:145301.951 server #4 started [alerter #1]
19085:20240610:145301.952 server #5 started [alerter #2]
19086:20240610:145301.952 server #6 started [alerter #3]
19087:20240610:145301.953 server #7 started [preprocessing manager #1]
19088:20240610:145301.953 server #8 started [lld manager #1]
19089:20240610:145301.953 server #9 started [lld worker #1]
19090:20240610:145301.954 server #10 started [lld worker #2]
19093:20240610:145301.955 server #12 started [housekeeper #1]
19091:20240610:145301.955 server #11 started [ipmi manager #1]
19094:20240610:145301.955 server #13 started [timer #1]
19097:20240610:145301.956 server #15 started [browser poller #1]
19095:20240610:145301.957 server #14 started [http poller #1]
19100:20240610:145301.958 server #17 started [history syncer #1]
19099:20240610:145301.958 server #16 started [discovery manager #1]
19102:20240610:145301.958 server #19 started [history syncer #3]
19101:20240610:145301.958 server #18 started [history syncer #2]
19087:20240610:145301.958 [3] thread started [preprocessing worker #3]
19087:20240610:145301.958 [1] thread started [preprocessing worker #1]
19110:20240610:145301.959 server #20 started [history syncer #4]
19087:20240610:145301.959 [2] thread started [preprocessing worker #2]
19113:20240610:145301.960 server #21 started [escalator #1]
19099:20240610:145301.960 for a discovery process with 5 workers, the user limit of 1024 file descriptors is insufficient. The maximum number of concurrent checks per worker has been reduced to 122
19115:20240610:145301.961 server #23 started [proxy poller #1]
19116:20240610:145301.962 server #24 started [self-monitoring #1]
19118:20240610:145301.963 server #26 started [vmware collector #2]
19117:20240610:145301.963 server #25 started [vmware collector #1]
19119:20240610:145301.963 server #27 started [vmware collector #3]
19120:20240610:145301.963 server #28 started [vmware collector #4]
19114:20240610:145301.963 server #22 started [ipmi poller #1]
19124:20240610:145301.964 server #30 started [task manager #1]
19123:20240610:145301.964 server #29 started [vmware collector #5]
19125:20240610:145301.964 server #31 started [poller #1]
19127:20240610:145301.965 server #32 started [poller #2]
19128:20240610:145301.966 server #33 started [poller #3]
19130:20240610:145301.966 server #35 started [poller #5]
19131:20240610:145301.967 server #36 started [unreachable poller #1]
19129:20240610:145301.967 server #34 started [poller #4]
19133:20240610:145301.968 server #38 started [unreachable poller #3]
19132:20240610:145301.968 server #37 started [unreachable poller #2]
19134:20240610:145301.970 server #39 started [unreachable poller #4]
19135:20240610:145301.971 server #40 started [unreachable poller #5]
19136:20240610:145301.971 server #41 started [unreachable poller #6]
19137:20240610:145301.973 server #42 started [unreachable poller #7]
19138:20240610:145301.974 server #43 started [unreachable poller #8]
19139:20240610:145301.974 server #44 started [unreachable poller #9]
19140:20240610:145301.975 server #45 started [unreachable poller #10]
19141:20240610:145301.976 server #46 started [trapper #1]
19142:20240610:145301.977 server #47 started [trapper #2]
19144:20240610:145301.978 server #48 started [trapper #3]
19145:20240610:145301.978 server #49 started [trapper #4]
19146:20240610:145301.979 server #50 started [trapper #5]
19151:20240610:145301.981 server #51 started [icmp pinger #1]
19152:20240610:145301.982 server #52 started [icmp pinger #2]
19099:20240610:145301.982 thread started [discovery worker #1]
19154:20240610:145301.982 server #53 started [icmp pinger #3]
19099:20240610:145301.982 thread started [discovery worker #4]
19099:20240610:145301.982 thread started [discovery worker #2]
19099:20240610:145301.982 thread started [discovery worker #5]
19099:20240610:145301.982 thread started [discovery worker #3]
19159:20240610:145301.983 server #54 started [icmp pinger #4]
19160:20240610:145301.983 server #55 started [icmp pinger #5]
19161:20240610:145301.984 server #56 started [icmp pinger #6]
19162:20240610:145301.984 server #57 started [icmp pinger #7]
19163:20240610:145301.984 server #58 started [icmp pinger #8]
19164:20240610:145301.985 server #59 started [icmp pinger #9]
19165:20240610:145301.985 server #60 started [icmp pinger #10]
19166:20240610:145301.986 server #61 started [alert syncer #1]
19167:20240610:145301.986 server #62 started [history poller #1]
19169:20240610:145301.987 server #63 started [history poller #2]
19170:20240610:145301.987 server #64 started [history poller #3]
19172:20240610:145301.988 server #66 started [history poller #5]
19174:20240610:145301.989 server #67 started [availability manager #1]
19171:20240610:145301.989 server #65 started [history poller #4]
19180:20240610:145301.991 server #68 started [trigger housekeeper #1]
19182:20240610:145301.991 server #69 started [odbc poller #1]
19183:20240610:145301.992 server #70 started [http agent poller #1]
19183:20240610:145301.992 thread started
19185:20240610:145301.992 server #71 started [agent poller #1]
19185:20240610:145301.992 thread started
19187:20240610:145301.993 server #72 started [snmp poller #1]
19187:20240610:145301.993 thread started
19189:20240610:145301.993 server #73 started [configuration syncer worker #1]
19191:20240610:145301.994 server #74 started [internal poller #1]
19192:20240610:145301.994 server #75 started [proxy group manager #1]
19185:20240610:145303.995 enabling Zabbix agent checks on host "Zabbix server": interface became available
Wie Ihr seht ist der erste Host schon im Monitoring - Der Server selbst (der Agent startet automatisch bei der Installation).
Bei einem Proxy kann es noch folgende Fehlermeldung geben:
failed to update local proxy configuration copy: Can't open JSON object or array ""failed"}"
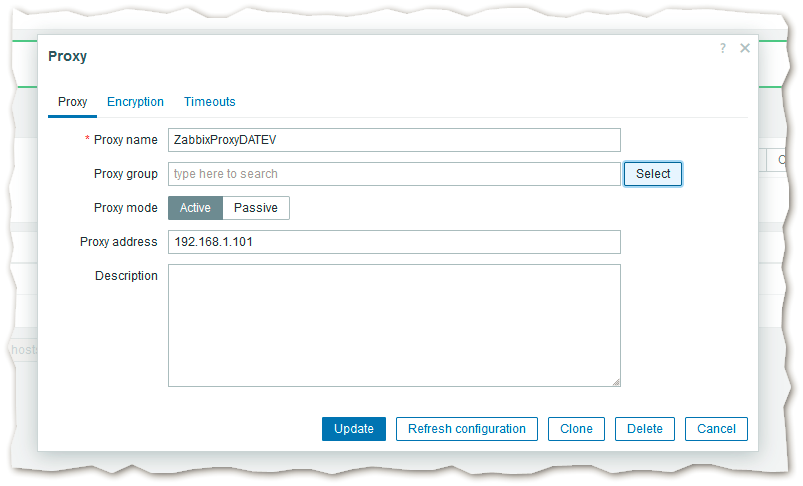
Naja, wir müssen den Proxy auf unserem Zabbix-Server unter
Administration - Proxies
noch anlegen - und zwar bitte genau mit dem gleichen Namen wie in der zabbix_proxy.conf unter Hostname= angegeben - dann ist der Fehler weg.
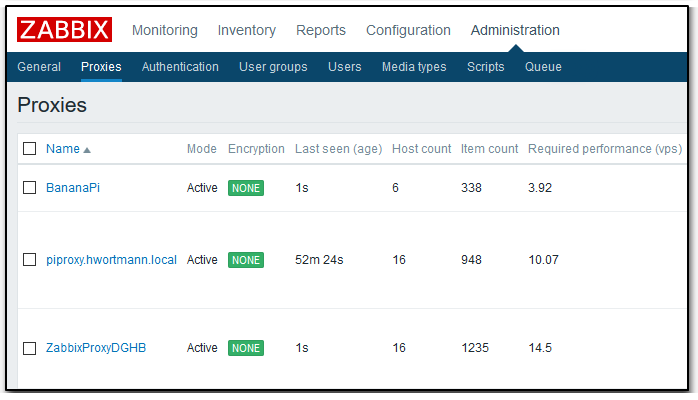
Bei Erfolg sollte das dann so aussehen:
An den Sekunden unter 'Last seen (age)' sehen wir die letzte Kontaktaufnahme.
Wenn da überhaupt etwas steht hatten wir Erfolg!
Webinterface installieren (nur Server)
- Schon jetzt findet Ihr die Weboberfläche unter http://servername/zabbix (nach einem Neustart, aber mit falscher Zeitzone)
- Wenn es aber ein exklusiver Server für Zabbix ist möchte ich auf die Eingabe von /zabbix verzichten - das wird nachfolgend beschrieben.
- Ich installiere hier also so das man den Server später nur mit http://servername aufrufen kann
Konfigurationsdatei bearbeiten
nano /etc/apache2/sites-available/000-default.conf
und den gesamten Inhalt durch den folgenden ersetzen: (F9 löscht eine Zeile)
Ab Zabbix 6.0
<VirtualHost *:80>
    ServerAdmin webmaster@localhost
    DocumentRoot /usr/share/zabbix
    ErrorLog ${APACHE_LOG_DIR}/error.log
    CustomLog ${APACHE_LOG_DIR}/access.log combined

    <Directory "/usr/share/zabbix">
        Options FollowSymLinks
        AllowOverride None
        Order allow,deny
        Allow from all
        <IfModule mod_php.c>
            php_value max_execution_time 300
            php_value memory_limit 128M
            php_value post_max_size 16M
            php_value upload_max_filesize 2M
            php_value max_input_time 300
            php_value max_input_vars 10000
            php_value always_populate_raw_post_data -1
            php_value date.timezone Europe/Berlin
        </IfModule>
    </Directory>
    <Directory "/usr/share/zabbix/conf">
        Order deny,allow
        Deny from all
        <files *.php>
            Order deny,allow
            Deny from all
        </files>
    </Directory>
    <Directory "/usr/share/zabbix/app">
        Order deny,allow
        Deny from all
        <files *.php>
            Order deny,allow
            Deny from all
        </files>
    </Directory>
    <Directory "/usr/share/zabbix/include">
        Order deny,allow
        Deny from all
        <files *.php>
            Order deny,allow
            Deny from all
        </files>
    </Directory>
    <Directory "/usr/share/zabbix/local">
        Order deny,allow
        Deny from all
        <files *.php>
            Order deny,allow
            Deny from all
        </files>
    </Directory>
    <Directory "/usr/share/zabbix/vendor">
        Order deny,allow
        Deny from all
        <files *.php>
            Order deny,allow
            Deny from all
        </files>
    </Directory>
</VirtualHost>
Danach Webserver neu starten:
systemctl restart apache2.service
Nun auf die Weboberfläche gehen, die sollte unter http://IP-Adresse oder http://DNS-Name verfügbar sein.
Anmerkung: So ein Linux trägt sich nicht von allein in den DNS Server ein, ggf. müsst Ihr den da von Hand nachtragen.
Webinterface konfigurieren
Ihr ruft den Zabbix-Server im Browser auf:
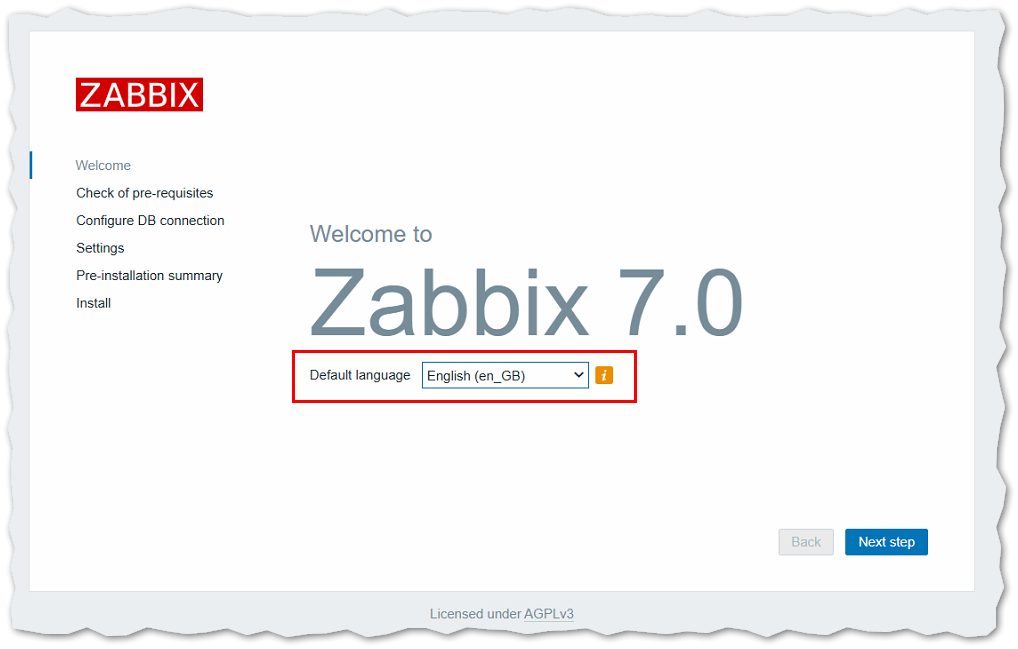
Am besten wählt Ihr hier gleich die Sprache Englisch (en_GB), dann stimmt auch das Datums- und Uhrzeitformat.
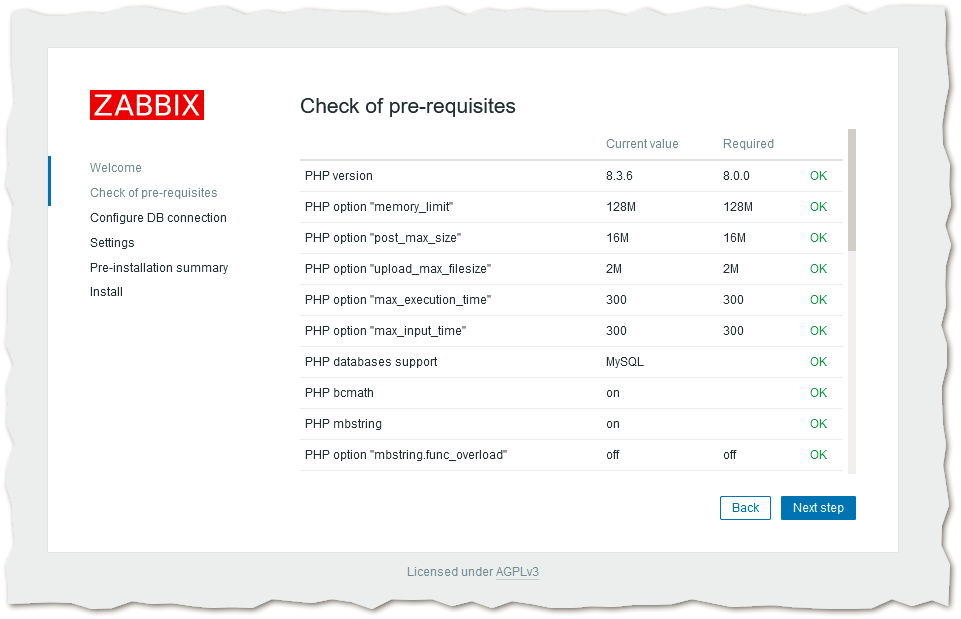
Wenn Ihr den Inhalt der 000-default.conf wie zuvor beschrieben geändert habt sollte hier alles grün sein:
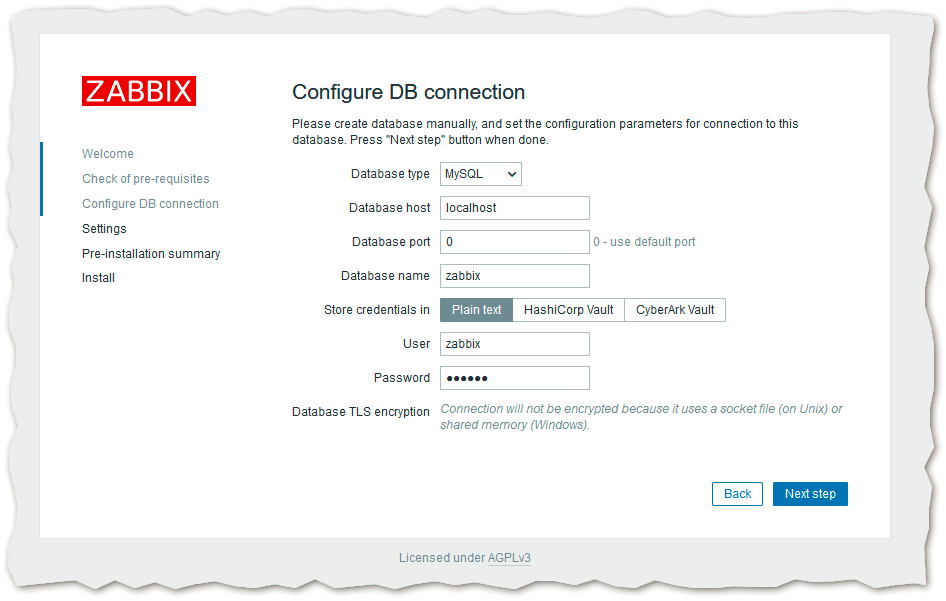
Die Datenbankkonfiguration, in die letzten 3 Felder muss überall "zabbix" stehen:
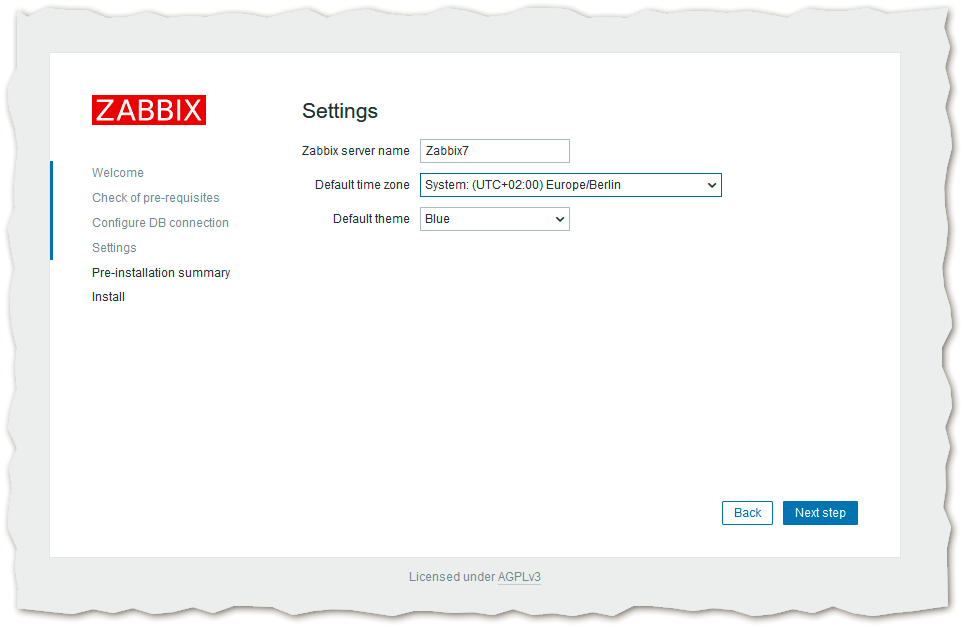
In dem leeren Feld könnt Ihr den Namen des Servers angeben. Dieser wird oben rechts und auf den Web-Tabs angezeigt:
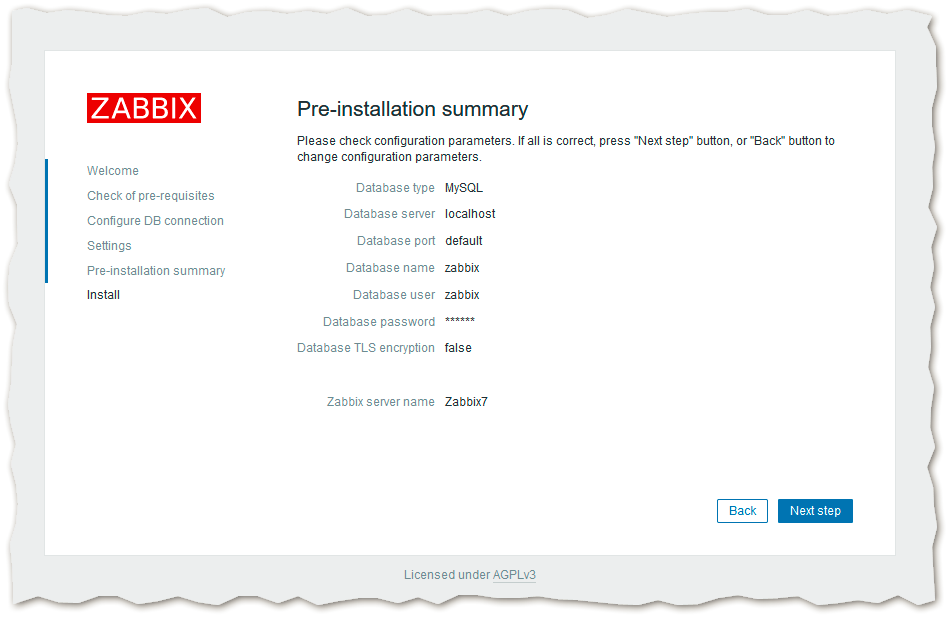
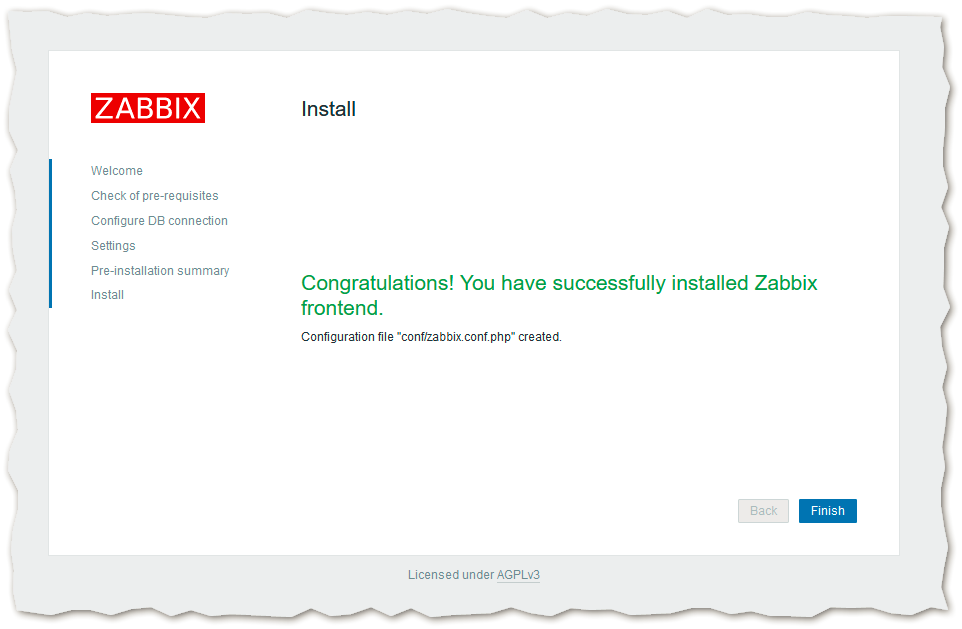
Noch eben die Zusammenfassung bestätigen:
Geschafft!
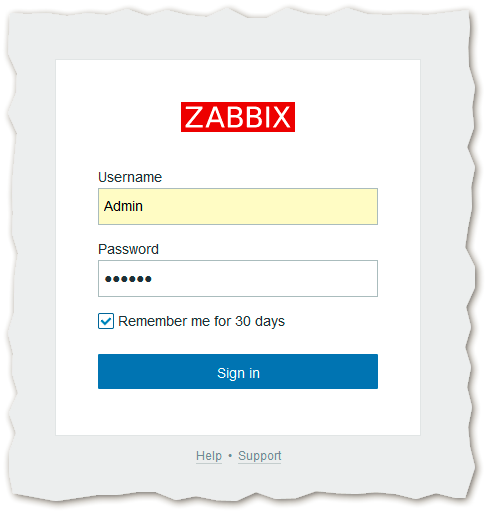
Benutzername: Admin
Passwort:     zabbix
Anzeigeformat 24h statt AM/PM festlegen
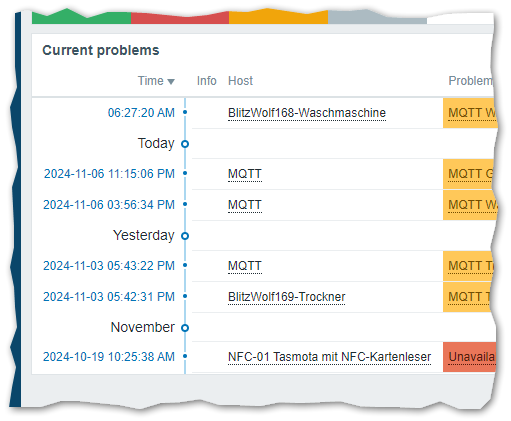
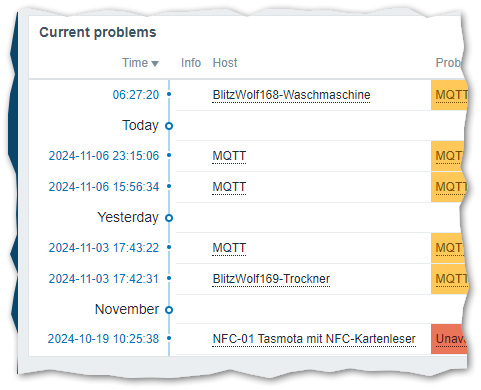
In allen Dialogen verwendet Zabbix 7 nun das 12h + AM/PM Format:
Das ist der amerikanische Standard. Das Zeitformat ändert sich auf die 24h Schreibweise wenn man die Anzeigesprache auf Deutsch stellt.
Ich nutze aber gerne die englische Anzeige, möchte aber trotzdem das 24h Format haben.
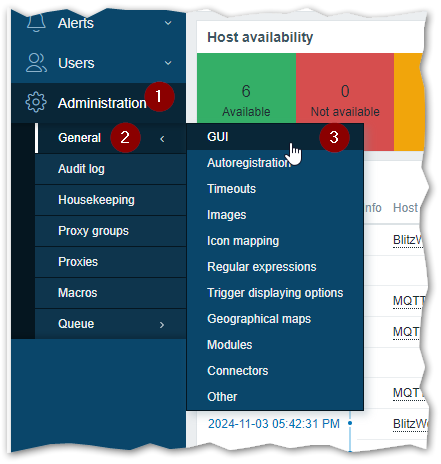
Dazu navigieren wir nach
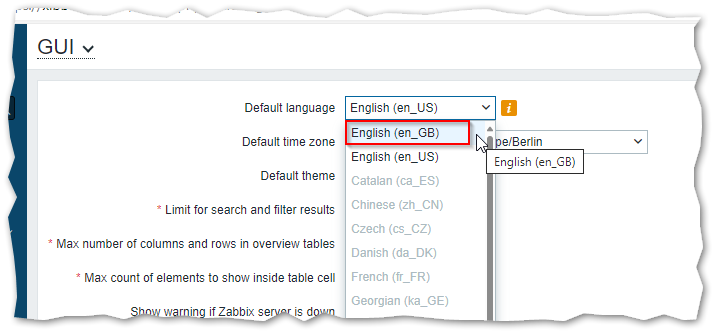
Administration => General => GUI
und stellen die Default language um auf English (en_GB):
Mit Update bestätigen und schon haben wir überall das 24h Format:
Empfang von SNMP-Traps einrichten
Die Lösung stammt in Teilen von https://sbcode.net/zabbix/snmp-traps/
fehlende Pakete nachinstallieren
Wir Installieren ggf. die benötigten Pakete nach (sollten schon vorhanden sein):
apt install -y snmp snmpd snmp-mibs-downloader snmptrapd libnet-snmp-perl libnet-ip-perl libnet-netmask-perl libnet-dns-perl libxml-writer-perl libnet-snmp-perl
snmptrapd aktivieren und konfigurieren
snmpd deaktivieren:
systemctl stop snmpd.service && systemctl disable snmpd.service
snmptrapd reparieren:
systemctl edit snmptrapd.service
und oben folgenden Text einfügen
### Editing /etc/systemd/system/snmptrapd.service.d/override.conf
### Anything between here and the comment below will become the contents of the drop-in file

[Install]
WantedBy=multi-user.target

### Edits below this comment will be discarded
snmptrapd aktivieren:
systemctl enable snmptrapd.service
snmptrapd konfigurieren:
nano /etc/snmp/snmptrapd.conf
und fügen die folgenden Zeilen ans Ende:
perl do "/usr/bin/zabbix_trap_receiver.pl";
disableAuthorization yes
und den Dienst neu starten:
systemctl restart snmptrapd.service
zabbix_trap_receiver.pl einrichten
Aktuelles Skript herunterladen - der Download ist von meiner Webseite, das original findet Ihr unter https://git.zabbix.com/projects/ZBX/repos/zabbix/raw/misc/snmptrap/zabbix_trap_receiver.pl
Der direkte Download von dort funktioniert aber nicht (immer):
wget https://git.zabbix.com/projects/ZBX/repos/zabbix/raw/misc/snmptrap/zabbix_trap_receiver.pl -O /usr/bin/zabbix_trap_receiver.pl
falls der nicht geht, nehmt diesen Link:
wget https://znil.net/images/zabbix_trap_receiver.pl -O /usr/bin/zabbix_trap_receiver.pl
und ausführbar machen
chmod a+x /usr/bin/zabbix_trap_receiver.pl
Für den Fall das der Download nicht zur Verfügung steht hier der Inhalt der Datei:
#!/usr/bin/env perl

#
# Copyright (C) 2001-2024 Zabbix SIA
#
# This program is free software: you can redistribute it and/or modify it under the terms of
# the GNU Affero General Public License as published by the Free Software Foundation, version 3.
#
# This program is distributed in the hope that it will be useful, but WITHOUT ANY WARRANTY;
# without even the implied warranty of MERCHANTABILITY or FITNESS FOR A PARTICULAR PURPOSE.
# See the GNU Affero General Public License for more details.
#
# You should have received a copy of the GNU Affero General Public License along with this program.
# If not, see <https://www.gnu.org/licenses/>.
#

#########################################
#### ABOUT ZABBIX SNMP TRAP RECEIVER ####
#########################################

# This is an embedded perl SNMP trapper receiver designed for sending data to the server.
# The receiver will pass the received SNMP traps to Zabbix server or proxy running on the
# same machine. Please configure the server/proxy accordingly.
#
# Read more about using embedded perl with Net-SNMP:
#       http://net-snmp.sourceforge.net/wiki/index.php/Tut:Extending_snmpd_using_perl

#################################################
#### ZABBIX SNMP TRAP RECEIVER CONFIGURATION ####
#################################################

### Option: SNMPTrapperFile
#       Temporary file used for passing data to the server (or proxy). Must be the same
#       as in the server (or proxy) configuration file.
#
# Mandatory: yes
# Default:
$SNMPTrapperFile = '/tmp/zabbix_traps.tmp';

### Option: DateTimeFormat
#       The date time format in strftime() format. Please make sure to have a corresponding
#       log time format for the SNMP trap items.
#
# Mandatory: yes
# Default:
$DateTimeFormat = '%Y-%m-%dT%T%z';

###################################
#### ZABBIX SNMP TRAP RECEIVER ####
###################################

use Fcntl qw(O_WRONLY O_APPEND O_CREAT);
use POSIX qw(strftime);
use NetSNMP::TrapReceiver;

sub zabbix_receiver
{
        my (%pdu_info) = %{$_[0]};
        my (@varbinds) = @{$_[1]};

        # open the output file
        unless (sysopen(OUTPUT_FILE, $SNMPTrapperFile, O_WRONLY|O_APPEND|O_CREAT, 0666))
        {
                print STDERR "Cannot open [$SNMPTrapperFile]: $!\n";
                return NETSNMPTRAPD_HANDLER_FAIL;
        }

        # get the host name
        my $hostname = $pdu_info{'receivedfrom'} || 'unknown';
        if ($hostname ne 'unknown')
        {
                $hostname =~ /\[(.*?)\].*/;                    # format: "UDP: [127.0.0.1]:41070->[127.0.0.1]"
                $hostname = $1 || 'unknown';
        }

        # print trap header
        #       timestamp must be placed at the beginning of the first line (can be omitted)
        #       the first line must include the header "ZBXTRAP [IP/DNS address] "
        #              * IP/DNS address is the used to find the corresponding SNMP trap items
        #              * this header will be cut during processing (will not appear in the item value)
        printf OUTPUT_FILE "%s ZBXTRAP %s\n", strftime($DateTimeFormat, localtime), $hostname;

        # print the PDU info
        print OUTPUT_FILE "PDU INFO:\n";
        foreach my $key(keys(%pdu_info))
        {
                if ($pdu_info{$key} !~ /^[[:print:]]*$/)
                {
                        my $OctetAsHex = unpack('H*', $pdu_info{$key}); # convert octet string to hex
                        $pdu_info{$key} = "0x$OctetAsHex";              # apply 0x prefix for consistency
                }

                printf OUTPUT_FILE "  %-30s %s\n", $key, $pdu_info{$key};
        }

        # print the variable bindings:
        print OUTPUT_FILE "VARBINDS:\n";
        foreach my $x (@varbinds)
        {
                printf OUTPUT_FILE "  %-30s type=%-2d value=%s\n", $x->[0], $x->[2], $x->[1];
        }

        close (OUTPUT_FILE);

        return NETSNMPTRAPD_HANDLER_OK;
}

NetSNMP::TrapReceiver::register("all", \&zabbix_receiver) or
        die "failed to register Zabbix SNMP trap receiver\n";

print STDOUT "Loaded Zabbix SNMP trap receiver\n";
MIBS nutzen
Die MIBS übersetzen die OID in lesbare Namen. Um diese zu nutzen:
nano /etc/snmp/snmp.conf
und dort aus
mibs :
ein
#mibs :
machen. Dann den Dienst neu starten:
systemctl restart snmptrapd.service
logrotate für /tmp/zabbix_traps.tmp erstellen
Gerade wenn viele Einträge in der Datei
/tmp/zabbix_traps.tmp
landen kann das schon mal einigen Platz kosten.
Deshalb nutzen wir logrotate an um die Größe der Datei zu begrenzen.
nano /etc/logrotate.d/zabbix_traps
und folgenden Inhalt einfügen / anpassen:
/tmp/zabbix_traps.tmp {
        su snmptt Debian-snmp
        create 666 snmptt Debian-snmp
        missingok
        notifempty
        daily
        rotate 4
        size 1M
        compress
        sharedscripts
        maxage 365
}
Zabbix Server oder Proxy konfigurieren
Die Konfigurationsdatei zum bearbeiten öffnen:
nano /etc/zabbix/zabbix_server.conf
oder
nano /etc/zabbix/zabbix_proxy.conf
und folgende Zeilen suchen und ändern bzw. Kommentarzeichen davor entfernen:
SNMPTrapperFile=/tmp/zabbix_traps.tmp
StartSNMPTrapper=1
Danach müssen wir den Zabbix Server oder Proxy Dienst neu starten:
systemctl restart zabbix-server.service
oder
systemctl restart zabbix-proxy.service
Trapper-Datei anlegen / Testen
Die Datei /tmp/zabbix_traps.tmp gibt es noch nicht.
Die wird aber ggf. erst beim ersten eintreffenden Trap erstellt. Deshalb:
snmptrap -v 1 -c public localhost 1.3.6.1.4.1.2.3 "" 6 3 0000 s s "Zabbix-SNMP-Traps"
Damit senden wir einen Test-Trap an uns selbst.
Nun sollte es die Datei geben:
ls -l /tmp/zabbix_traps.tmp
Ausgabe:
-rw-r--r-- 1 Debian-snmp Debian-snmp 893 Mai 27 12:50 /tmp/zabbix_traps.tmp
Der Inhalt sollte wie folgt sein:
cat /tmp/zabbix_traps.tmp
12:03:21 2023/03/20 ZBXTRAP 127.0.0.1
PDU INFO:
  community                      public
  requestid                      0
  transactionid                  1
  receivedfrom                   UDP: [127.0.0.1]:48627->[127.0.0.1]:162
  errorindex                     0
  notificationtype               TRAP
  version                        0
  errorstatus                    0
  messageid                      0
VARBINDS:
  DISMAN-EVENT-MIB::sysUpTimeInstance type=67 value=Timeticks: (0) 0:00:00.00
  SNMPv2-MIB::snmpTrapOID.0      type=6  value=OID: SNMPv2-SMI::enterprises.2.3.0.3
  SNMPv2-SMI::snmpV2             type=4  value=STRING: "Zabbix-SNMP-Traps"
  SNMP-COMMUNITY-MIB::snmpTrapAddress.0 type=64 value=IpAddress: 10.88.1.88
  SNMP-COMMUNITY-MIB::snmpTrapCommunity.0 type=4  value=STRING: "public"
  SNMPv2-MIB::snmpTrapEnterprise.0 type=6  value=OID: SNMPv2-SMI::enterprises.2.3
Nach einem Reboot ist Datei weg bis der erste Trap eintrifft - was Zabbix aber nicht zu stören scheint.
Agent konfigurieren (nur Proxy)
Wir wollen natürlich unseren 'Zabbix Proxy' gleich mit überwachen!
Wenn es ein Server ist, ist dieser gleich automatisch mit drin (ist der erste Host der schon in der Liste steht, ist sogar schon aktiv!)
Bearbeiten wir zunächst die Konfigurationsdatei:
nano /etc/zabbix/zabbix_agent2.conf
und ändert folgende Zeile:
Hostname=zabbixproxy.domain.local
Den Namen passt Ihr natürlich an eure Bedürfnisse an - wichtig ist nur das Ihr den Host auf dem Zabbix-Server unter exakt dem gleichen Namen anlegt!
Das Start-Skript haben wir vorhin schon aktiviert.
Am besten bootet Ihr euren Zabbix Proxy nun einmal durch und prüft hinterher ob die Prozesse für den Agenten und den Server laufen.
Windows-Freigabe für Agenten-Dateien einrichten
In meinen früheren Anleitungen wurde in diesem Abschnitt beschrieben wie man eine Samba-Freigabe erstellt in welcher der Zabbix-Agent abgelegt wird.
Das mache ich in der Praxis nicht mehr - neuere Windows-Versionen finden es unvorstellbar das man auf eine Freigabe ohne Passwort zugreifen möchte.
Man könnte den Zabbix-Server zwar dazu zum Mitglied in der Domäne machen ... aber inzwischen erstelle ich einfach eine passende Freigabe auf einen der Windows-Server, in der Regel einer der Domänencontroller.
Das Installationspaket hat nur ein paar MByte, da findet sich ein Plätzchen.
Zabbix Reporting-Services installieren / aktivieren
Installiert sollte es schon sein, falls nicht:
apt install zabbix-web-service
Dann aktivieren und starten:
systemctl enable zabbix-web-service.service
systemctl start zabbix-web-service.service
Der Dienst lauscht per Default auf Port 10053 was in der /etc/zabbix/zabbix_web_service.conf konfiguriert wird.
Anfragen nimmt er nur von lokal entgegen (127.0.0.1 / ::1)
Nun den Dienst auch noch im Zabbix-Server bekannt machen:
nano /etc/zabbix/zabbix_server.conf
und die folgenden Zeilen ändern:
StartReportWriters=3
WebServiceURL=http://localhost:10053/report
Im Anschluß Zabbix einmal neu starten:
systemctl restart zabbix-server.service
Im Webinterface müsst ihr nun einmal hinterlegen wir die Reporting-Services das Zabbix-Frontend erreichen können:
Unter Administration . General - Other bei Frontend URL folgendes setzen:
http://localhost/
Jetzt muss noch Google-Chromium-Browser installiert werden, den braucht der Dienst zum Erstellen der PDFs. Da wir keine GUI auf dem Zabbix-Server haben laden wir den Browser einfach direkt als Paket herunter und installieren diesen:
wget https://dl.google.com/linux/direct/google-chrome-stable_current_amd64.deb
dpkg -i google-chrome-stable_current_amd64.deb
apt install -f -y
dpkg --configure -a
Ja, das ist etwas umständlich, wir installieren Chrome, er meckert über fehlende Abhängigkeiten, die beheben wir dann und lassen das Konfigurieren noch mal laufen.
Dafür ist der dann installiert ohne das wir eine grafische Oberfläche auf dem Server installieren mussten.
Datensicherung des Zabbix-Servers
Bevorzugt installiere ich Zabbix-Server als Virtuelle Maschinen / VM.
Die Backup-Software sichert am besten einfach die gesamte VM.
Eigentlich macht quasi jede Backup-Software hierzu während der Sicherung einen Snapshot, sichert die Festplattendaten und löst dann den Snapshot wieder auf.
Wer dabei sicher gehen will das die Datenbank in einem konsistenten Zustand gesichert wird kann folgendes tun:
Methode 1: Cold Backup - Zabbix und Datenbank anhalten
Bei dieser Methode passiert folgendes:
- Die Zabbix-Server und die Datenbank werden vor einem Snapshot angehalten
- Der Snapshot wird erstellt
- Die Datenbank und der Zabbix-Server werden wieder gestartet
Unter VMware funktioniert das mit 2 Skripten die wir wie folgt anlegen:
nano /usr/sbin/pre-freeze-script
mit folgendem Inhalt:
#!/bin/sh
echo "$(date) pre-freeze start" >> /tmp/snapshot.log
systemctl stop zabbix-server.service
systemctl stop mariadb.service
echo "$(date) pre-freeze stop" >> /tmp/snapshot.log
und
nano /usr/sbin/post-thaw-script
#!/bin/sh
echo "$(date) post-thaw start" >> /tmp/snapshot.log
systemctl start mariadb.service
systemctl start zabbix-server.service
echo "$(date) post-thaw stop" >> /tmp/snapshot.log
Jetzt müssen wir die beiden Skripte noch ausführbar machen und dem root zuordnen:
chmod 0700 /usr/sbin/pre-freeze-script
chmod 0700 /usr/sbin/post-thaw-script
chown root:root /usr/sbin/pre-freeze-script
chown root:root /usr/sbin/post-thaw-script
Voraussetzung ist das die VMware-Tools installiert sind!
Dabei ist es egal ob es sich um die Original VMware-Tools oder um die Open-VM-Tools aus den Repositories handelt.
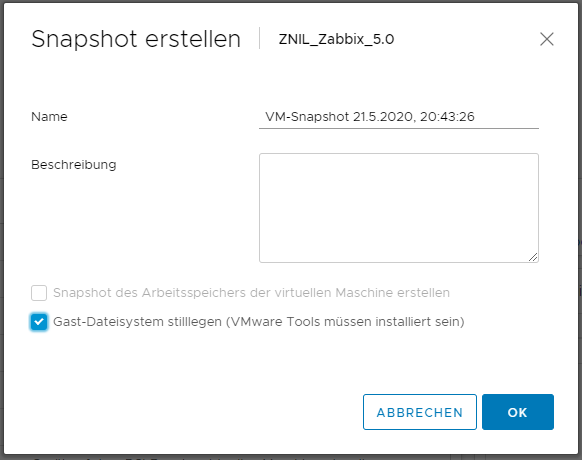
Nun können wir die Skripts testen indem wir einen Snapshot mit den folgenden Einstellungen erstellen:
Wenn wir uns die Logs ansehen sollte
- Ein Eintrag in die Datei /tmp/snapshot.log vorgenommen
- Der Zabbix-Server gestoppt
- Der MariaDB-Server gestoppt
- Wieder ein Eintrag in die Datei /tmp/snapshot.log geschrieben
- Der MariaDB-Server wieder gestartet
- Der Zabbix-Server wieder gestartet
werden.
Methode 2: Hot Backup - Datenbank einfrieren
Bei dieser Methode passiert folgendes:
- Die Datenbank wird vor einem Snapshot auf "READ ONLY" gesetzt - zuvor werden noch alle Daten geschrieben ("FLUSH TABLES")
- Der Snapshot wird erstellt
- Die Datenbank wird wieder für Schreibzugriffe freigegeben
Unter VMware funktioniert das mit 2 Skripten die wir wie folgt anlegen:
nano /usr/sbin/pre-freeze-script
mit folgendem Inhalt:
#!/bin/sh
# 2018-04-20 Bernhard Linz
# Original script by Pascal Di Marco, check https://www.veeam.com/wp-consistent-protection-mysql-mariadb.html for more information
# Log will be write to syslog and(!) to /tmp/snapshot.log
echo "$0 pre-freeze start" | logger
echo "-------------------------------------------------------------------------------------" >> /tmp/snapshot.log
echo "$0 $(date '+%Y-%m-%d %H:%M:%S') pre-freeze start" >> /tmp/snapshot.log
# Set Username and Passwort for MySQL Access. Set mysql_password="" if no password needed
mysql_username="root"
mysql_password=""
timeout=300

# ************************************************************************************************
# No Changes behind this line!
# ************************************************************************************************
# Check if username + password is used
if [ -n "$mysql_password" ]; then
    use_credentials="-u$mysql_username -p$mysql_password"
else
    use_credentials=""
fi

# Name of the Lockfile
lock_file=/tmp/mysql_tables_read_lock

sleep_time=$((timeout+10))
rm -f $lock_file
echo "$0 executing FLUSH TABLES WITH READ LOCK" | logger
echo "$0 $(date '+%Y-%m-%d %H:%M:%S') executing FLUSH TABLES WITH READ LOCK" >> /tmp/snapshot.log

# Start READ LOCK - Process will send to background (and will still run after script is completed. Lock will stop if process is stopped
# After READ ONLY mode is entered the lockfile will be created. Process will stop when getting stop signal from post-thaw-script or timeout reached
mysql $use_credentials -e "FLUSH TABLES WITH READ LOCK; system touch $lock_file; system nohup sleep $sleep_time; system echo lock released|logger; " > /dev/null &
# get the PID of the mysql process
mysql_pid=$!

echo "$0 child pid $mysql_pid" | logger
echo "$0 $(date '+%Y-%m-%d %H:%M:%S') child pid $mysql_pid" >> /tmp/snapshot.log

# Waiting for the lockfile ...
c=0
while [ ! -f $lock_file ]
do
    # check if mysql is running
    if ! ps -p $mysql_pid 1>/dev/null ; then
        echo "$0 mysql command has failed (bad credentials?)" | logger
        echo "$0 $(date '+%Y-%m-%d %H:%M:%S') mysql command has failed (bad credentials?)" >> /tmp/snapshot.log
        exit 1
    fi
    sleep 1
    c=$((c+1))
    # check if the script run into timeout
    if [ $c -gt $timeout ]; then
        echo "$0 timed out waiting for lock" | logger
        echo "$0 $(date '+%Y-%m-%d %H:%M:%S') timed out waiting for lock" >> /tmp/snapshot.log
        touch $lock_file
        kill $mysql_pid
    fi
done
# write PID into the lockfile
echo $mysql_pid > $lock_file

echo "$0 pre-freeze stop" | logger
echo "$0 $(date '+%Y-%m-%d %H:%M:%S') pre-freeze stop" >> /tmp/snapshot.log

exit 0
und
nano /usr/sbin/post-thaw-script
#!/bin/sh
# 2018-04-20 Bernhard Linz
# Original script by Pascal Di Marco, check https://www.veeam.com/wp-consistent-protection-mysql-mariadb.html for more information
# Log will be write to syslog and(!) to /tmp/snapshot.log
echo "$0 post-thaw start" | logger
echo "$0  $(date '+%Y-%m-%d %H:%M:%S') post-thaw start" >> /tmp/snapshot.log

lock_file=/tmp/mysql_tables_read_lock

# get PID from lockfile
mysql_pid=$(cat $lock_file)
echo "$0 sending sigterm to $mysql_pid" | logger
echo "$0  $(date '+%Y-%m-%d %H:%M:%S') sending sigterm to $mysql_pid" >> /tmp/snapshot.log
# and send stop to process
pkill -9 -P $mysql_pid
rm -f $lock_file

echo "$0 post-thaw stop" | logger
echo "$0  $(date '+%Y-%m-%d %H:%M:%S') post-thaw stop" >> /tmp/snapshot.log

exit 0
Jetzt müssen wir die beiden Skripte noch ausführbar machen und dem root zuordnen:
chmod 0700 /usr/sbin/pre-freeze-script
chmod 0700 /usr/sbin/post-thaw-script
chown root:root /usr/sbin/pre-freeze-script
chown root:root /usr/sbin/post-thaw-script
Voraussetzung ist das die VMware-Tools installiert sind!
Dabei ist es egal ob es sich um die Original VMware-Tools oder um die Open-VM-Tools aus den Repositories handelt.
Nun können wir die Skripts testen indem wir einen Snapshot mit den folgenden Einstellungen erstellen:
Beispielausgabe aus der
cat /tmp/snapshot.log
-------------------------------------------------------------------------------------
/usr/sbin/pre-freeze-script 2023-03-20 12:49:14 pre-freeze start
/usr/sbin/pre-freeze-script 2023-03-20 12:49:14 executing FLUSH TABLES WITH READ LOCK
/usr/sbin/pre-freeze-script 2023-03-20 12:49:14 child pid 11824
/usr/sbin/pre-freeze-script 2023-03-20 12:49:15 pre-freeze stop
/usr/sbin/post-thaw-script  2023-03-20 12:49:18 post-thaw start
/usr/sbin/post-thaw-script  2023-03-20 12:49:18 sending sigterm to 11824
/usr/sbin/post-thaw-script  2023-03-20 12:49:18 post-thaw stop
Falls es mit dem Passwort mal hakt so müsste das auch dort stehen:
/usr/sbin/pre-freeze-script 2018-06-13 12:01:04 mysql command has failed (bad credentials?)
Mehr Details stehen ggf. im syslog
tail -f -n 500 /var/log/syslog
Zabbix selbst nimmt den Vorgang relativ locker und meldet maximal einige slow query bei inserts.
In den meisten Umgebungen geht das so schnell das nicht einmal diese kommen (4 bis 5 Sekunden).
Festplatte im laufenden Betrieb vergrößern
Ihr habt den NextCloud-Server nach dieser Anleitung hier als VM installiert (und ohne LVM) und nun geht euch der Platz aus?
Kein Problem, Ihr könnt die Festplatte im laufenden Betrieb vergößern!
Schritt 1: Platz an die Festplatte anhängen
- Stellt sicher das auf der VM zur zeit kein Snapshot aktiv ist!
- Vergrößert die Festplatte um den benötigten Speicherplatz
in dem Beispiel hier wird der Platz von 50 auf 100GB vergrößert.
Schritt 2: Betriebssystem die neue Größe erkennen lassen
Die einfachste und sicherste Methode ist den Server neu zu starten.
Wer will kann es aber auch im laufenden Betrieb durchführen, und das geht so:
Wir müssen die Festplattenkontroller-Adapternummer ermitteln:
grep mpt /sys/class/scsi_host/host*/proc_name
findet er nichts probiert
grep pvscsi /sys/class/scsi_host/host*/proc_name
Beispielausgaben (eine von beiden wird kommen):
/sys/class/scsi_host/host32/proc_name:mptspi
/sys/class/scsi_host/host2/proc_name:vmw_pvscsi
Die Nummer ist in diesem Fall host32! Die brauchen wir für den nächsten Befehl:
find /sys -name rescan | grep host32
Beispielausgabe:
/sys/devices/pci0000:00/0000:00:10.0/host32/target32:0:0/32:0:0:0/rescan
Ok, an die Festplatte schicken wir jetzt eine 1 um den Rescan auszulösen:
echo 1 > /sys/devices/pci0000:00/0000:00:10.0/host32/target32:0:0/32:0:0:0/rescan
Fertig!
Im Anschluß zur Kontrolle ein
fdisk -l
Die Ausgabe sollte ähnlich wie diese sein:
Festplatte /dev/sda: 100 GiB, 107374182400 Bytes, 209715200 Sektoren
Festplattenmodell: Virtual disk
Einheiten: Sektoren von 1 * 512 = 512 Bytes
Sektorgröße (logisch/physikalisch): 512 Bytes / 512 Bytes
E/A-Größe (minimal/optimal): 512 Bytes / 512 Bytes
Festplattenbezeichnungstyp: gpt
Festplattenbezeichner: 9BE90D25-A550-48DB-9E50-6CAC38D87217

Gerät       Anfang     Ende Sektoren Größe Typ
/dev/sda1     2048  2203647  2201600    1G EFI-System
/dev/sda2  2203648 52426751 50223104 23,9G Linux-Dateisystem
Wir können sehen das sda nun 100GB groß ist, in der letzten Zeile sehen wir aber das die Partition sda2 zur Zeit noch 23,9Gb groß ist - prima!
Schritt 3: Partition vergrößern
Das /var/www Verzeichnis unserer zweiten Partition der Festplatte befindet sich auf dem Gerät
/dev/sda2
wenn Ihr nach dieser Anleitung installiert hattet. Kontrollieren könnte Ihr das z.B. mit
df -h
und dann schauen was links vom Verzeichnis / steht:
Dateisystem    Größe Benutzt Verf. Verw% Eingehängt auf
tmpfs           392M    1,2M  391M    1% /run
/dev/sda2        63G    8,8G   51G   15% /
tmpfs           2,0G       0  2,0G    0% /dev/shm
tmpfs           5,0M       0  5,0M    0% /run/lock
tmpfs           392M     12K  392M    1% /run/user/0
Die nächsten Befehle gehen von /dev/sda2, wenn der Pfad anderes ist müsst Ihr diesen anpassen!
growpart /dev/sda 2
resize2fs /dev/sda2
Ja, beim ersten Befehl ist da ein Leerzeichen zwischen dem sda und der 2, beim zweiten Befehl nicht.
Schritt 4: Das war schon alles!
Ihr könnt mit
df -h
es einmal kontrollieren - aber das war schon alles:
Dateisystem    Größe Benutzt Verf. Verw% Eingehängt auf
tmpfs           391M    1,2M  390M    1% /run
/dev/sda2        32G    7,6G   23G   26% /
tmpfs           2,0G       0  2,0G    0% /dev/shm
tmpfs           5,0M       0  5,0M    0% /run/lock
/dev/sdb1        99G    655M   93G    1% /var/www
tmpfs           391M    4,0K  391M    1% /run/user/1000

